This lesson is going to show you the sequence for how to paint leaves on trees in oil paint as well as painting your detail and edges in a landscape painting. Don’t forget to look for the link to the dvd at the end of the post.
( If You Like This Lesson, Click the Facebook “Like” button)
Many people ask questions such as…“Should I paint over another area (overlapping), should I paint around an area I already painted, etc.
Let’s try to cover some of that here.
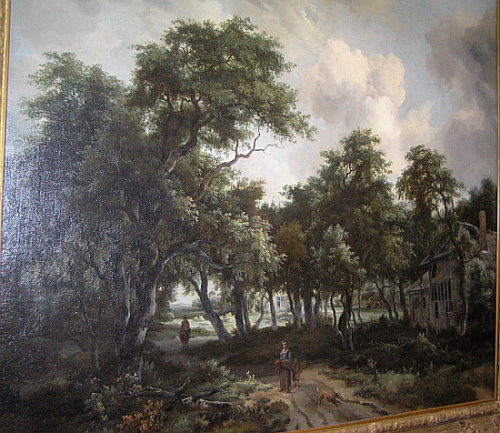
I will use an old master landscape for our lesson.
Note: Museums are the best place to learn and I strongly suggest going as often as you can and looking for real examples of the lessons you learn from me.

This is an old master landscape painted by the Dutch artist named “Hobbema”. A nice wooded landscape I’m sure any of you would be happy to paint, or at least know the procedure to create a landscape painting such as this. Then you could paint your own landscape using the same or similar procedures.
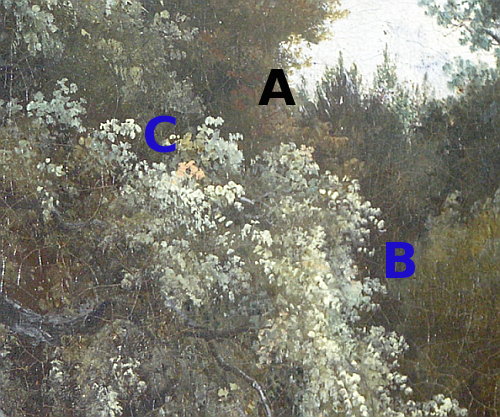
Lets focus on a detail of this painting and see some of the leaves on trees in the next image…

Look to the right of the Black Letter “A”. Do you see how those leaves overlap the sky? This is painted over, not around. Have no fear about going over the sky. It is most likely done after the sky has already dried. Painting into a wet layer, like I will explain soon, helps to get rid of that cut out look.
If you look to the left of the letter “B” and at the highlighted leaves all around the letter “C” you will see another example of detail being painted “over” not “around” an area.
The step by step process would be something like the following…Let’s use the area to the left of the letter “B”.
After the dark areas of the trees in the background were already in and dried, an intermediate glaze layer would have been applied…
Here are the steps from this point, starting with the intermediate glaze layer.
1) Use a bristle brush of the size that would fit the area you are working on.
As an example, you may want the bristles to be around the width of the letter “B” itself. This should give you a good idea of the size brush to use if you were working on this painting and the image above was life-size.
Now, take that bristle brush and dip into a darker green and thin it down with your medium. Perhaps a mixture of sap green with a little burnt umber, or perhaps raw umber with some ultramarine blue. The color mixture is not what we are focusing on here so I am generalizing about color for this example.
We are only mixing color and thinning paint, getting it to the right consistency in this step.
2) Loading this paint on your brush. The paint should not cover anything, therefore we do not need thick paint. Your goal here is to only make the canvas wet to paint into it and add a thin film of color. And not dripping wet either, just a damp film (maybe think of it as a stain) of color.
3) Apply this thin film of color over the dried area where you are going to work on the detail. This would give you a wet base to work into.
4) Make sure you have a clean brush and create a mixture for the light color of your leaves on your palette, but not your lightest, (perhaps with some sap green mixed into a light gray – again color mixture is not the focus of this lesson so I am generalizing on the color)
5) Take a clean small sable brush to apply this mixture right into your thin film of color that you have using dabs with the point of your brush. The harder you push, the larger the dab for a larger clump of leaves. Do not try to paint every individual leaf at this point.
6) When your dabs of color start to take on the color of the thin film of color you put down in step 3, it is time to load your brush with more fresh color of the mixture you made in step 4. How many dabs will this take to happen?…until you need to reload?… Perhaps 3 to 5 dabs. And when you pick up a fresh supply of paint on your brush, make sure the brush is clean first. Yes, that may mean cleaning it in turpentine before picking up the color again. Wiping it on paper towels alone may work as well.
You have to judge when you pick up and apply new color. If it is not clean, your brush was still dirty.
If you do not clean the brush between loadings of it, your dabs will blend more into the dark area that already have down. This may be effective to paint the light areas which are not the final highlights, but not for the real hard light areas where you are picking out individual leaves.
7) Lighten your mixture with more white (or lighter gray) and load your brush to pick out even lighter leaves which have even more light shining on them. This calls for a little thicker paint and a softer touch with your brush. You are laying on the paint, right over the other paint you layed down. Don’t keep teasing the dabs or they will mix with the wet paint underneath and lose their original brightness.
The thicker the paint, the lighter you need to apply paint with your brush.
If some areas are too light and you need to make them blend into the background more, you can use the sable brush without any paint on it and dry and dab into the paint you already have on the canvas, because everything is already wet, it will automatically blend into the thin film of color that you originally laid down.
Soft Edges
Note that areas are painted right over one another. Every leaf is not drawn in first and then the sky carefully filled in around it.
The edges of the trees are not drawn in first and then the sky carefully filled in around that.
And edge is a detail and can only be made soft by overlapping areas, either when the paint is dry or wet. However, putting down a wet film of paint like I described above will help keep edges soft, especially if you use the right medium. using the right medium will automatically soften edges for you.
Of course, paint what is “behind” first and paint the overlapping objects afterwards.
Details All Over
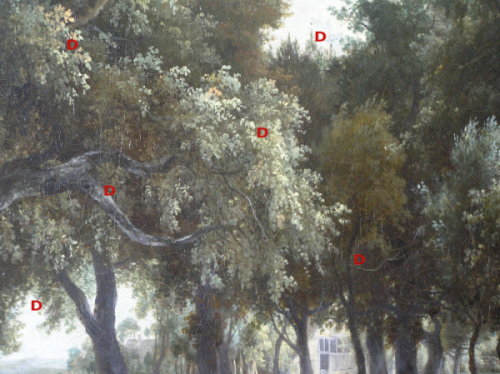
In this image below you can see I have put a red letter “D” next to some areas where there are details that are painted over other areas.

Branches, highlights on branches, highlights on leaves, leaves painted over the sky, etc.
It is the highlights on the leaves that do all the “drawing” work. They are the details and they make it seem as if every last leaf is drawn. The darker areas are masses of dark, and have no real detail in them.
But with some dabs of lighter thicker paint, these individual leaves are picked out and are great detail work.
Want to See This On Video?
If you want to watch this entire landscape painting being recreated from start to finish, check out the dvd How to paint an old master landscape using modern methods. This will cover how to paint leaves on trees in oil and a lot lot more.
( If You Like This Lesson, Click the Facebook “Like” button)

Very interesting I would love to see it on thevideo
Check out my “How to paint a landscape” video here
I think all of your lessons are really good! Each one tell us something we didn’t already know–even if we have been painting a long time. One of your lessons has made me want to paint someone without outlining their features on the canvas using your techniques—which I have never done!! I also like the idea of painting the entire canvas with a darker color. It really gives the subject of the painting a lot more three d effect, Ditto with the trees! Thanks again.
I ordered your video course a year or so ago and recommend it to all “emerging” artists who need basic advice and a path to follow while they find their own style. Recently I added a TV and DVD player to my studio just so I could watch them while i paint; it’s like painting with a friend. When I ordered the videos, I was very frustrated with my work, trying to read my (extensive!) collection of art books, take lessons locally, etc. — desperate to get back into painting. Everything just confused me. Your method put me back on track, simplified things for me and helped me to find my own balance.By the way, I work for a gallery, and have my work represented in another one. I still feel I have a long way to go, and I am always surprised, as I veiw the lessons yet again, at how much more I pick up each time. It isn’t the only way, but it is a great way to accomplish mastering tradional methods, the basis of all methods when it comes down to it.
Thank you. I’m glad you know you are learning from them. It’s a smart move to watch things over and over again. It’s just like practice. Of course, when it comes to oil painting, most people practice the wrong thing over and over so they get proficient in the wrong thing.
I would also like to see this on video as well as book
Hi Carolyn,
Check out “how to paint a landscape” dvd here
This is just to thankyou for putting yr couse on who to paint in a book/notes form as i really do like to be able to read what i should be doing while i paint, so thankyou again, i recently ordered it and i am looking forward to getting it soon!
Lindsay ( Australia)